(If you have got a font which has the Indian rupee symbol installed, then the rest of the instructions should hold good for any other Linux distribution as well. I also assume you are using Gnome for a few of the instructions. Note: If you have one of the fonts listed below installed, then you can type Ctrl+Shift+u 20b9 to get the rupee symbol. This works in all GTK/Gnome applications and in OpenOffice. However it is cumbersome and the method below shows you how to get the rupee symbol by typing right Alt + 3.)
First, you have to get a font which has the Indian Rupee symbol, which has the Unicode codepoint U20B9. As of writing, I know of two fonts which support it (at the correct Unicode location instead of replacing other letters), the Ubuntu font and the Rupakara font.
If you are using Ubuntu maverick (10.10), then the Ubuntu font already comes out of the box, so you don’t need to install anything. If you are using older Ubuntu versions or Debian then you can
- Install the Ubuntu font, which you can get here.
- Install my Debian package for the Rupakara font.
These packages can be installed by using sudo dpkg -i filename.deb at a Terminal.
To type the rupee symbol, you either need to replace one of the existing characters on the keyboard or use the AltGr key, using which one can use the extended keyboard and get a lot of extra glyphs. If you are using the standard keyboard layout (US English), you do not have an AltGr key and have to remap one of the existing Alt keys. Users with the US International or US Alternative International or UK keyboard layouts have the right Alt key mapped as the AltGr key. [ You can find out which keyboard layout you are using now by going to System » Preferences » Keyboard and selecting Layouts. The top option is your default layout and if you have more than one layout in the list then the keyboard indicator icon at the top right should show the current layout. ]
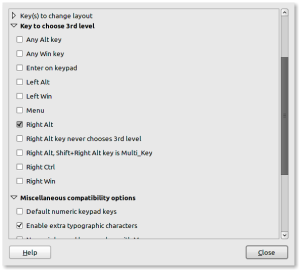
An alternative to switching to the US International/UK layout is to simply remap your right Alt key to the AltGr key, which can be done in Keyboard preferences » Layouts » Options. Select Keys to choose 3rd level and tick the Right Alt option. Also check Enable extra typographic characters under Miscellaneous compatibility options (Figure 1). A way of doing this from the command line is to use the first part of the tutorial given here.
Figure 1
Once you have an AltGr key, the next step is to assign the Rupee symbol to AltGr+a key of your choice. I choose 3, so AltGr+3 will give you the rupee sign. To do this open a text editor and type:
keycode 12 = 3 numbersign 3 numbersign U20B9 sterling U20B9 sterling
Save the file with the name .Xmodmap (note the dot at the front) in your home folder.
This will assign the rupee to AltGr+3 and the pound (£) symbol to AltGr+Shift+3.
Log out and log back in, Gnome should ask if you want to load the .Xmodmap file, click on the file and then click Load. Enjoy the rupee symbol!
PS If you are use Openbox or a lightweight window manager then you should put xmodmap ~/.Xmodmap in your ~/.xinitrc or ~/.xsession. Of course, if you already have a .Xmodmap file then append the previous line there.

Pingback: Typing the Indian rupee symbol in Debian/Ubuntu < IndiaNewsBox Buzz – What's India Talking About
I solved the problem by switching to US International (ISO 8859-15). Thanks for the guide 🙂
You post very interesting posts here. Your page deserves much more traffic.
It can go viral if you give it initial boost, i know very useful tool that can help you, just
search in google: svetsern traffic tips